
 Data Recovery Software
 Hard Drive Data Recovery
 SSD Data Recovery
 Deleted File Recovery
 Pen Drive Gone Blank
 Memory Card Not Opening
 External Hard Disk

RAID Data Recovery: Methods, Challenges And Best Practices
A RAID array is built to keep working when a disk fails. That is exactly why its failures are confusing. By the time the array stops, something has usually gone wrong more than once and the disks on the desk no longer explain themselves. Connect one member to a PC and Windows shows an empty or unreadable disk, because each member holds only slices of the volume.
RAID data recovery is the work of putting those slices back in the right order, with the right sizes and the right parity, without writing a single byte to the disks. This guide explains how the common RAID levels spread data, what has to be worked out before anything can be read, how a NAS fits in, what partial recovery means when too many disks are missing and the habits that keep a recoverable array recoverable.
How RAID Spreads Data Across Disks
Most RAID levels cut the volume into chunks of a fixed size, often called the stripe size or chunk size and commonly between 64 KB and 512 KB. The first chunk goes to the first disk, the next to the second disk and so on. One pass across all the disks is a stripe. Parity levels add one or two extra chunks to every stripe, calculated from the data chunks beside them.
- RAID 0 stripes data across all members with no redundancy. Every member is needed and losing one leaves a hole in almost every large file.
- RAID 1 mirrors the same data onto each member. Any one healthy member holds every file.
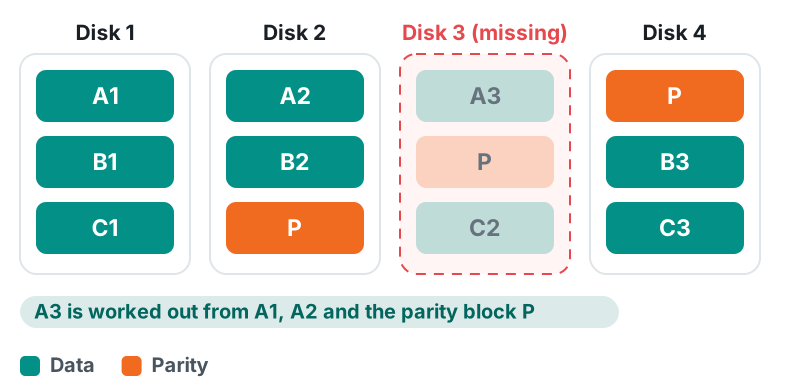
- RAID 5 adds one parity chunk to each stripe and the parity moves to a different disk in each stripe. The pattern it follows is the parity rotation. The array survives one missing member.
- RAID 6 adds two parity chunks, usually called P and Q, so it survives two missing members.
- RAID 10 stripes data across mirrored pairs. It survives one missing member in each pair, but not both disks of the same pair.
The Parameters That Must Be Right
To read an array without its controller, you need to know how it was built: the RAID level, the chunk size, the order of the members, the parity rotation and the offset, which is where the data starts on each member.
Get any one of these wrong and the volume reads as noise, even though every byte is still on the disks. A wrong order mixes up whole chunks. A wrong chunk size cuts files at the wrong points. A wrong offset shifts everything. RAID recovery is mostly about finding the layout first.
Why A Failed Array Is Different From A Failed Disk
When a single disk fails, its data is in one place and the file system on it describes itself. With an array, the description of the layout lives in a controller, in a NAS's own records or in metadata on the members. When the controller dies or the records are overwritten, the disks alone no longer say how they fit together.
Arrays also fail in stages. One disk drops out, the array runs degraded and a second disk fails, often during a rebuild, which reads every sector of every remaining disk. Each step the controller takes on its own, such as a rebuild, a re-sync or a re-initialisation, writes to the disks. Recovery starts by stopping all of that.
First Steps When An Array Fails
- Stop. Do not start or force a rebuild, do not force a dropped member back online and do not re-create or initialise the array.
- Label every disk with its slot or bay number before you take it out. The order matters and it is easy to lose once the disks are on a desk.
- Write down what you know: the RAID level, the number of disks, the file system, any disk replaced recently and which disk failed first if the logs or lights showed it.
- Connect the disks to a Windows PC. If Windows offers to initialise or format a disk, cancel.
- Image every member before any scan, starting with the weakest. DRE Pro's Create Disk Image copies a drive in two passes over an error map, healthy areas first and a stopped image can be resumed later.
How DRE Pro Works Out The Array Parameters
The best source of the layout is the array's own metadata. Linux software RAID, used by most NAS boxes, writes a record on every member that gives the level, the member order, the chunk size, the parity layout and the data offset. Some hardware RAID controllers write records in the standard DDF format at the end of each disk. When either is present, Auto Build RAID reads the layout from it, including degraded sets.
When there is no usable metadata, Auto Build RAID works the layout out from the data. It tries the RAID levels, stripe sizes, parity rotations and member orders against the file system it finds on the members and if nothing fits it tries again with one member assumed missing. This needs NTFS or ext structures on the members and works out the order for up to eight members. With more, you enter the order and check it.
It then assembles the best layouts, looks inside them for a partition table and a file system and recommends a Quick, Deep or RAW scan. A layout with weak evidence is shown for you to review with Preview, never accepted on its own. Any layout you already know can be entered by hand.
Assembly happens in memory. No metadata is written, so the disks can still go back in the NAS or server afterwards. The set is listed under RAID And Volume Sets as Complete, Degraded or Cannot Be Assembled, so you know where you stand before any scan starts.
NAS Arrays
Most home and office NAS boxes, including WD My Cloud, Synology and QNAP, run Linux. They join their disks with Linux software RAID, often add a volume manager layer on top and format the result as ext4 or Btrfs. Windows reads none of these, which is why a NAS disk connected to a PC looks empty or asks to be formatted.
DRE Pro reads each layer in turn: the RAID records on each disk, the volume layer, then the ext4 or Btrfs file system and its folders. The NAS is named from its own records. NAS RAID has been tested on a real WD My Cloud disk. Synology and QNAP layouts are tested on sets built to their published formats and real Synology and QNAP disk sets are still being tested.
Two points are easy to miss. A NAS cannot be recovered over the network, because a share shows only what the NAS chooses to show; the disks or images of them, must be connected to the PC. And an ext4 volume whose start was wiped, as a reset can leave it, can be opened from the backup copies ext4 keeps of its superblock.
Arrays With Missing Members
If the missing members are within what the level can tolerate, nothing has to be lost. A RAID 1, 5 or 10 with one member missing or a RAID 6 with up to two, is rebuilt from the others as it is read, provided the remaining disks read cleanly.
Beyond that, the arithmetic stops working. With two disks missing from the same RAID 5 stripe there are two unknowns and only one parity chunk, so the data that was only on those disks cannot be worked out by any software. The same applies to a RAID 6 with three missing and a RAID 0 with one.
What can still be done is partial recovery. DRE Pro opens such an array from the members that are present. The missing parts read as empty, the set is listed as Partial with how much of it is readable and every file is graded by how much of its data lies on the members found. Files wholly on them are recovered whole. The rest are marked Partly On Missing RAID Member, so nothing reaches you as whole that is not.
File size decides most of the outcome. A file smaller than one chunk often sits entirely on one disk, while a large file is spread over all of them. In our test on one disk of a three-disk WD My Cloud RAID 5, with the other two missing, tens of thousands of files came back whole, mostly photos and small documents and very few large files. On ext4, folders whose parent lay on a missing member are shown under Lost Folders rather than dropped.
Common Challenges In RAID Recovery
- Wrong disk order. Disks were moved between bays or nobody labelled them. Files open at the start and turn to noise later.
- Wrong chunk size. Small files open while larger ones break at regular intervals. A large file is the quickest test of a layout, because it crosses many chunks.
- Stale members. A disk that dropped out long before the final failure holds older data. Adding it back mixes old and new chunks and its parity no longer agrees with the rest. If you know which disk failed first, leave it out and treat it as missing.
- Controller metadata. Some controllers keep their records in their own formats. DRE Pro reads Linux software RAID and DDF records; for other controllers the layout is worked out from the data or entered by hand.
- Weak members. Bad sectors on a member become holes in the assembled volume. Image the disk first: unreadable areas stay as zeros in the image and are marked in its map.
- Unusual layouts. Nested levels such as RAID 50 and 60, delayed parity and vendor-specific layouts are not supported in DRE Pro's RAID Recovery.
Professional Best Practices
- Work on images, not the original disks. Every read of a weak disk is a risk, so spend those reads once, on a careful copy.
- Never write to a member. Save recovered files to a separate drive. DRE Pro refuses to save recovered files onto any disk that belongs to the set.
- Check the layout by looking inside it. A file system that lists folders and large files that preview correctly, are much stronger evidence than a layout that merely assembles.
- Keep notes: slot order, disk labels, the parameters found and the scan used. If something goes wrong, you can repeat the work exactly.
- Know when to stop. A disk that clicks, does not spin up or disappears under load may need a specialist with clean-room facilities. Software cannot read sectors a drive will not give.
Mistakes To Avoid
- Rebuilding onto a new disk while another member is weak. The rebuild reads every sector and can push the weak disk over the edge.
- Re-creating the array with what you think were the same settings. This writes new metadata and may initialise the disks.
- Letting Windows initialise or format a member because it shows as unknown.
- Running a file system repair on a degraded or wrongly assembled volume. Repairs write and on a wrong layout they change the wrong data.
- Adding a stale member back into the set.
- Scanning a failing disk again and again instead of imaging it once.
- Saving recovered files back onto the same array or NAS.
A Practical RAID Recovery Workflow
- Stop the array, shut the NAS or server down and do not start any rebuild.
- Label each disk with its slot or bay number, note which disk failed first if known and take the disks out.
- Connect them to a Windows 10 or 11 PC with SATA ports or USB adapters. Cancel any offer to initialise or format.
- Check each disk's health, then image every member that still reads with Create Disk Image, the weakest first, to a separate disk with enough free space.
- Open RAID Recovery, add each disk or image and click Auto Build RAID.
- Read the result: Complete, Degraded, Partial or a layout to review. Use Preview on a few large files to confirm the layout.
- Run the scan it recommends: Quick Scan when the file system reads, Deep Scan when its records are damaged, RAW Scan when nothing can be listed.
- Save the files to a separate drive, whole files first and open a sample of them before you wipe or reuse anything.
- Keep the original disks and the images until every important file has been checked.
Can A RAID 5 Be Recovered After One Disk Fails?
Yes, as long as the other members read. With one member missing, the missing data is worked out from parity as the set is read. Image any weak disk first and do not let the controller rebuild until your files are safe.
Can A RAID 5 With Two Failed Drives Be Recovered?
Not completely, unless one of the two failed disks can be read again. DRE Pro opens the array from the disks that are left, recovers the files that lie wholly on them and marks the rest as partial. If a failed disk still reads, image it and add the image and the array is back to one member missing.
Do I Need To Know The Stripe Size And Disk Order?
No. DRE Pro reads them from Linux software RAID or DDF records when the members carry them. Without such records, Auto Build RAID works out the level, stripe size, parity rotation and order from the data for up to eight members. If you do know the layout, you can enter it by hand.
Can I Recover Data From A NAS Without The NAS Box?
Yes. Take the disks out, connect them to a Windows PC and add them in RAID Recovery. DRE Pro puts the RAID and volume layers back together and reads the ext4 or Btrfs volume inside. It cannot read a NAS over the network.
Should I Rebuild The Array Before Trying Recovery?
No. A rebuild writes to every member and reads every sector of the weak ones. Image the disks first and recover the files from the images.
Does DRE Pro Write Anything To The RAID Disks?
No. The array is assembled in memory, no metadata is written to any member and recovered files are refused on any disk that belongs to the set. The disks can go back into the NAS or server afterwards.